
USB Extension Unit for Sega 3D Control Pad
Firmware Release History
| Release Version | Summary |
|---|---|
| v.1.0.0 | initial release |
| v.1.1.0 | Added ABXY swap function |
| v.2.0.0 | Compatible with Plus version (with additional buttons on the back of the unit) |
Xinput Firmware Release History
| Release Version | Summary |
|---|---|
| v.xin.1.0.0 | initial release |
| v.xin.1.1.0 | – Added ABXY swap function – Added analog stick mode switching function |
| v.xin.1.2.0 | Changed analog stick mode switching function to cross key mode switching function. |
| v.xin.1.3.0 | – Exchange c,z and L,R (“+” mode) assignments – Added LR CZ swap function |
| v.xin.2.0.0 | Compatible with Plus version (with additional buttons on the back of the unit) |
| v.xin.2.0.1 | Fixed a bug that caused the ABXY swap function to be turned on by default |
Switch Firmware Release History
| Release Version | Summary |
|---|---|
| v.switch.1.0.0 | initial release |
| v.switch.1.1.0 | Added LR CZ swap function |
| v.switch.1.2.0 | – Changed so that select, capture, and home can be assigned to c, y, and z in + mode – Changed analog stick mode switching function to cross key mode switching function. |
| v.switch.2.0.0 | Compatible with Plus version (with additional buttons on the back of the unit) |
Polymega Firmware Release History
| Release Version | Summary |
|---|---|
| v.poly.1.0.0 | initial release (based on v.xin.2.0.1) |
| v.poly.1.0.B | Optimized for Saturn Games |
Where to Buy
Kaden Ken-chanGEEKY Fab. BOOTH Branch
If you need international shipping, use BOOTH’s tenso.com service.
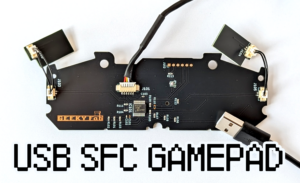
Product Overview
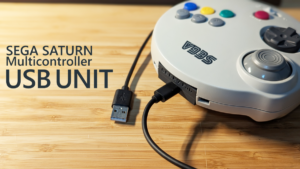
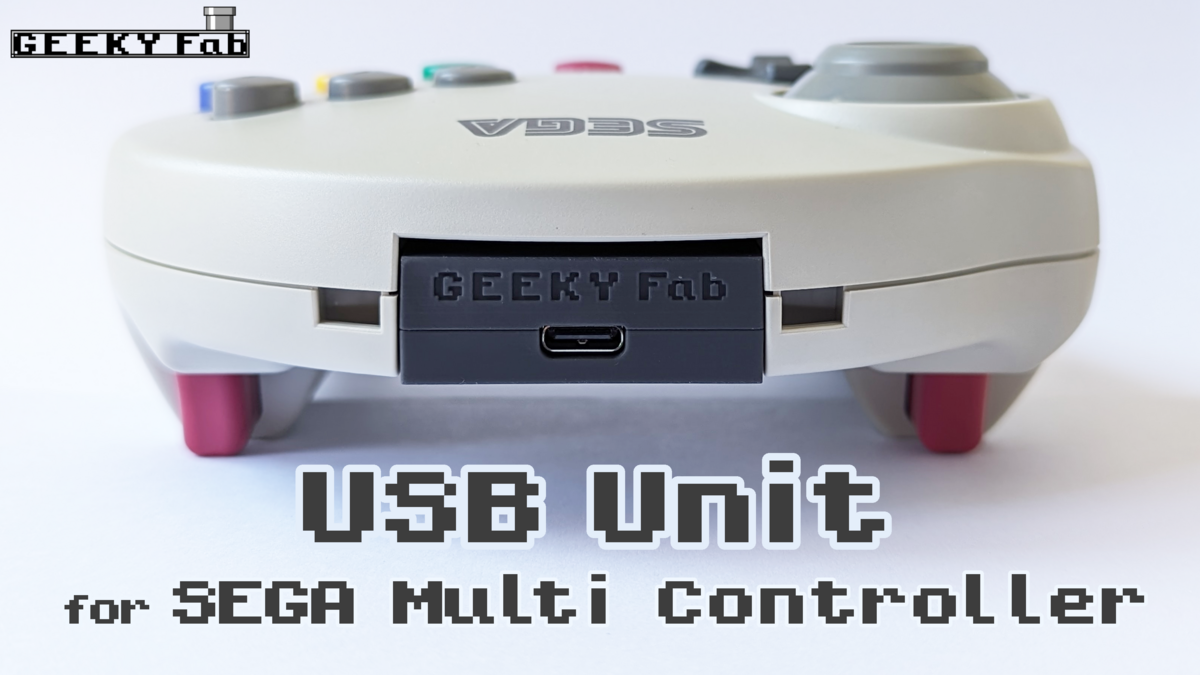
This is an extension unit for converting Sega Saturn’s 3D Control Pad (a.k.a. Multi-Controller in Japan) into a USB gamepad.
By replacing the standard unit with this product, 3D Control Pad can be used as a USB gamepad.
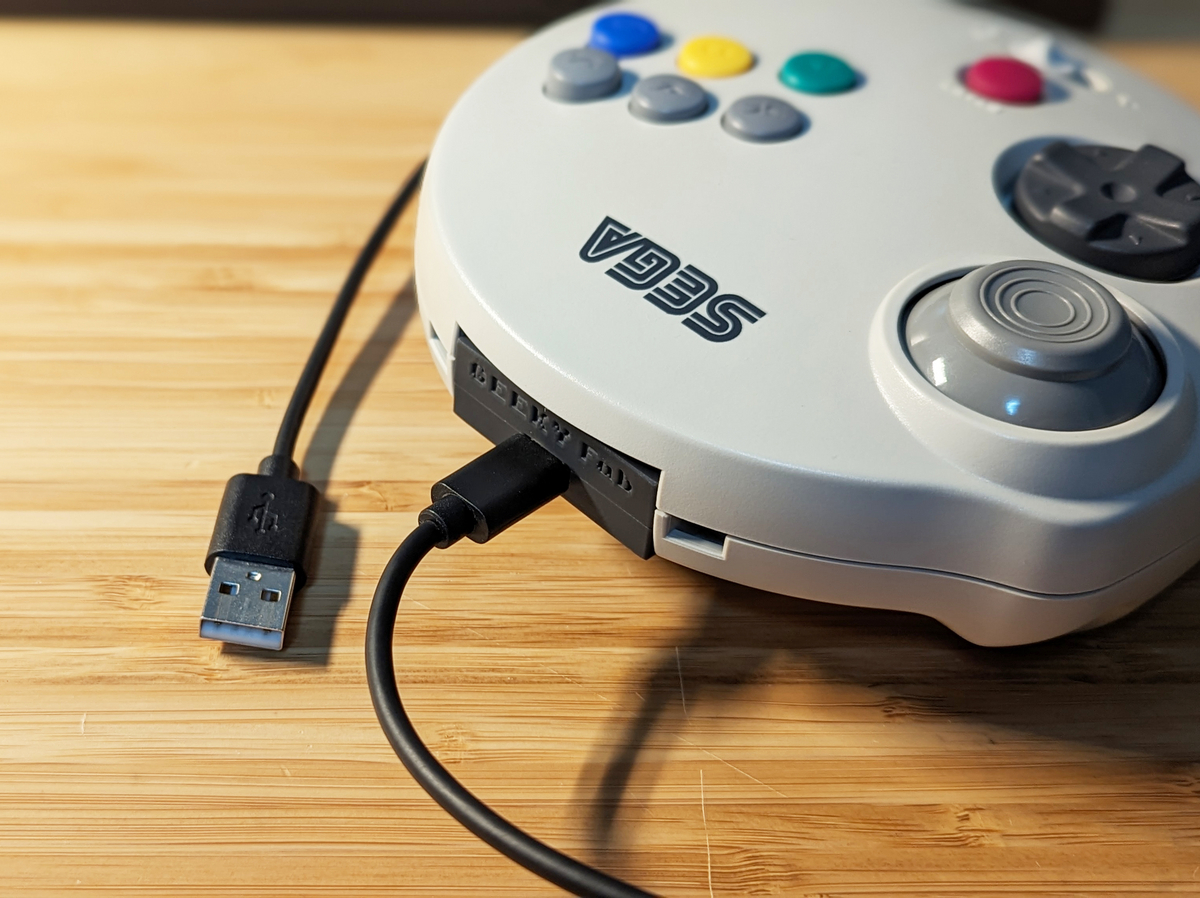
The USB connector uses Type-C.
Note: A USB cable is not included with the product. Please prepare it yourself.
The firmware is open-source, allowing users to edit it freely. You can write the edited firmware via USB.
Demo
Product Features
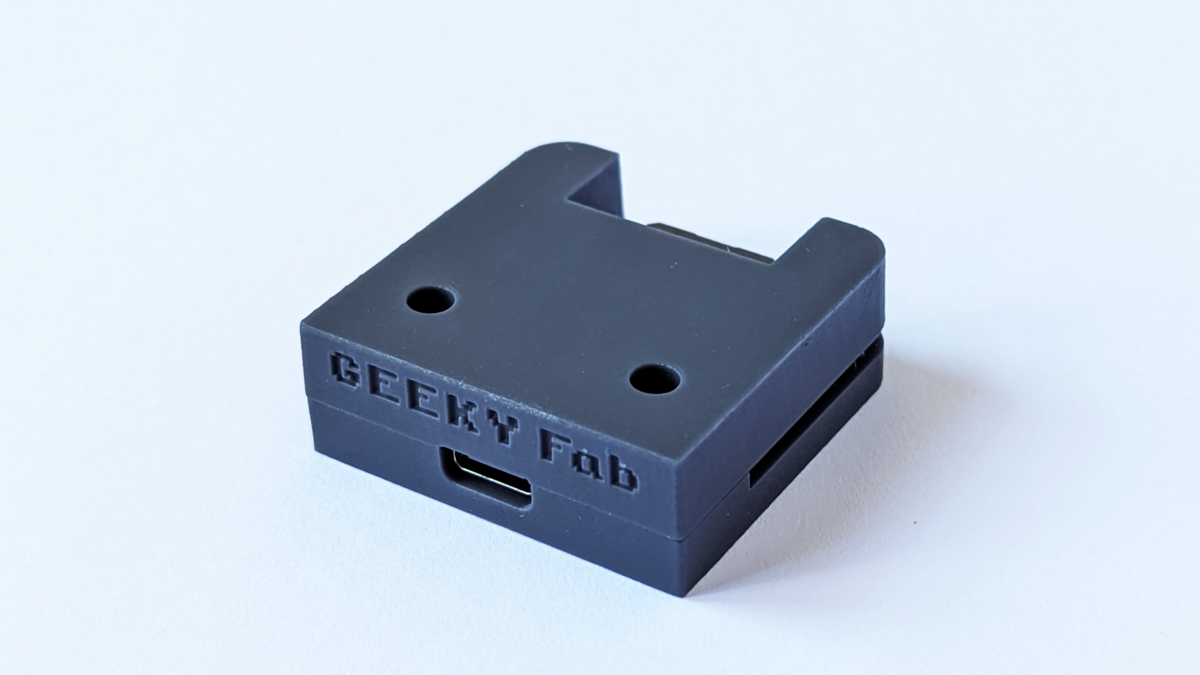
One-Touch Conversion to USB
By swapping the standard unit with this product, 3D Control Pad can be used as a USB gamepad.
Insert the USB cable while this product is attached to 3D Control Pad.
When you connect this product to a PC or similar device via a USB cable without attaching it to 3D Control Pad, it will boot in firmware writing mode.
Editable Firmware
The source code for the firmware is open-source.
https://github.com/takusan213/usb-ss3d-gamepad
You can write the firmware via USB.
When the extension unit is not inserted into 3D Control Pad and you plug the USB into a PC, the product will boot in firmware writing mode.
Mode Switching Support
Supports the mode toggle switch on the 3D Control Pad unit.
Button assignments for + Mode / 〇 Mode are as follows (in the case of standard firmware):
| 3D Control Pad Buttons | + Mode | 〇 Mode |
|---|---|---|
| A | 1 | 1 |
| B | 2 | 2 |
| C | 3 | 3 |
| X | 4 | 4 |
| Y | 5 | 5 |
| Z | 6 | 6 |
| L | 7 | Z-axis |
| R | 8 | Z-rotation |
| Start | 9 | 9 |
| Analog Stick | N/A | X-axis/Y-axis |
| D-pad | Hat Switch | Hat Switch |
| Back Switch (Plus version only) | 12 | 12 |
Tested OS / Game Consoles
- Retro Freak
- Windows10
- Windows11
- Raspberry PI 3
- Raspberry Pi OS
- Recalbox for RASPBERRY PI 3
- RetroPi 4.7.1 for RASPBERRY PI 2/3
- Raspberry PI 4
- Raspberry Pi OS
- Recalbox for RASPBERRY PI 4/400
- RetroPi 4.7.1 for RASPBERRY PI 4/400
Game Consoles with Confirmed Operation
The following game consoles have been confirmed to work based on user reports:
- POLYMEGA
- Requires firmware to be switched to the Xinput version (firmware details are at the end of this article)
- Enabling the analog setting in the game controller settings will make the analog stick operational
マルコンUSB拡張ユニットのポリメガ対応について、rukaさん( @ruka_riker )の調査で下記わかりました。
– xinput版ファームウェアを使用すると認識する
– ゲーム中のコントローラー設定のアナログ設定をONにするとアナログスティックが動作する https://t.co/AZ4Q1jd7gS— たくさん 🐦 GEEKY Fab. (@takusanToIssho) September 1, 2023
Additional Specifications
USB Connector: Type-C
Microcontroller Used: PIC Microcontroller (PIC16F1459)
Product Photos
Operation Verification
The method for operation verification is the same as that for the SFC Controller USB Gamepad board.
Please check here for more details.
Controller Settings in Steam
If you are using the standard firmware in Steam, please configure from Big Picture Mode. This page can be a reference.
Steamのコントローラー設定!ゲームパッド画面からのカスタマイズ方法 – Apple Geek LABO
If the controller is not recognized in Big Picture Mode, go to Steam Settings → Controller → General Controller Settings, and select “SS3D Gamepad” to assign buttons.
No need for the above settings if you are using the xinput version of the firmware.
Firmware Writing
Installing the Firmware Writing Software
You will need the writing software provided by Microchip’s MLA (Microchip Libraries for Applications) for firmware writing.
You can download the MLA installer from here.
Upon installing MLA, the writing software will be located in the following folder:<Installation Folder>\mla\v2018_11_26\apps\usb\device\bootloaders\utilities\bin\win\HIDBootloader.exe
Firmware Writing
Follow the steps below to write the firmware:
- Launch the writing software.
- Remove the extension unit from the Marcon body and insert the USB into the PC. This will boot the product in firmware writing mode.
Once booted in firmware writing mode, the writing software will connect.
- Click the folder icon (Import Firmware Image) at the top left and select the pre-built firmware (.hex file) to load.
- The second icon from the left (Erase/Program/Verify Device) will become active. Click it to write.
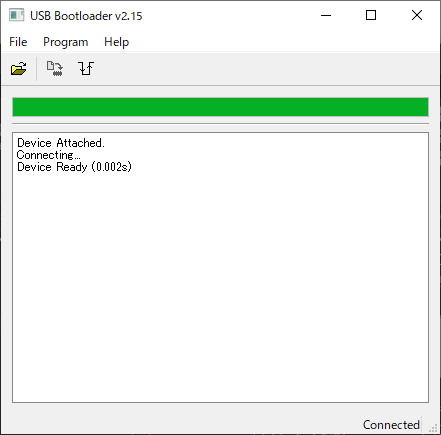
This completes the firmware writing process.
After that, unplug the USB cable once, attach the extension unit to Marcon, and reinsert the USB cable. You can then play with the firmware you’ve written.
Firmware Collection
The firmware is publicly available on GitHub.
To download from GitHub, click “Raw” at the top right to display the raw data, then right-click to save with the extension .hex.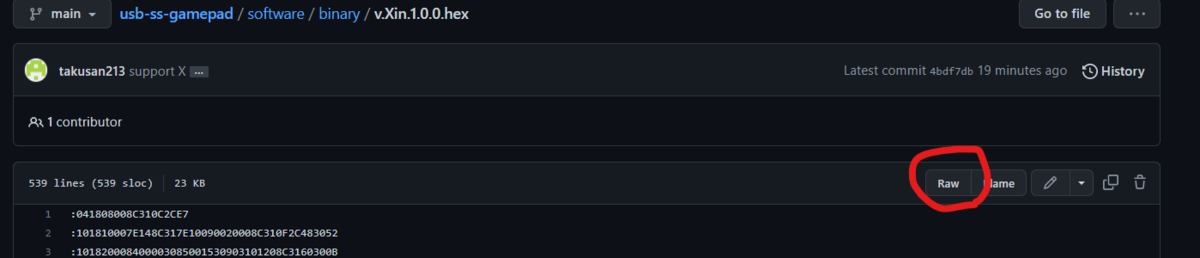
Original Firmware
v.2.0.0
The firmware that is written at the time of purchase.
Operates as a Direct input gamepad.
ABXY Swap Function
By pressing and holding the start button and the up arrow on the D-pad for more than one second, you can swap the button assignments between A and B, and X and Y.
Xinput version
v.xin.2.0.1.hex
This version supports Xinput.
Please use this version if you are using it with POLYMEGA.
Mapping
| 3D Control Pad Buttons | + Mode | 〇 Mode |
|---|---|---|
| A | A | A |
| B | B | B |
| C | R1 | R1 |
| X | X | X |
| Y | Y | Y |
| Z | L1 | L1 |
| L | LS | L Trigger |
| R | RS | R Trigger |
| start | start | start |
| Analog Stich | N/A | X/Y axis |
| D-pad | D-pad | D-pad |
| Back Switch (Plus version only) | back | back |
ABXY Swap Function
By pressing and holding the start button and the up arrow on the D-pad for more than one second, you can swap the button assignments between A and B, and X and Y.
LR CZ Swap Function
By pressing and holding the start button and the down arrow on the D-pad for more than one second, you can swap the button assignments between L and R, and C and Z.
D-pad Mode Change Function
For the Xinput version, by pressing and holding the start button and the left arrow on the D-pad for more than one second, you can switch the D-pad’s function from the “D-pad” to “Right Stick”.
The functions can be summarized as follows.
| long press button | function |
|---|---|
| start + ↑ | AB XY swap |
| start + ↓ | LR CZ swap |
| start + ← | D-pad mode change |
switch version
v.3.0.1.hex
This version supports Switch.
Mapping
| 3D Control Pad Buttons | + Mode | 〇 Mode |
|---|---|---|
| A | A | A |
| B | B | B |
| C | select | R |
| X | X | X |
| Y | capture | Y |
| Z | home | Z |
| L | ZL | ZL |
| R | ZR | ZR |
| start | start | start |
| Analog Stich | N/A | X/Y axis |
| D-pad | D-pad | D-pad |
| Back Switch (Plus version only) | select | select |
ABXY Swap Function
By pressing and holding the start button and the up arrow on the D-pad for more than one second, you can swap the button assignments between A and B, and X and Y.
LR CZ Swap Function
By pressing and holding the start button and the down arrow on the D-pad for more than one second, you can swap the button assignments between L and R, and C and Z.
D-pad Mode Change Function
By pressing and holding the start button and the left arrow on the D-pad for more than one second, you can switch the D-pad’s function from the “D-pad” to “Right Stick”.
The functions can be summarized as follows.
| long press button | function |
|---|---|
| start + ↑ | AB XY swap |
| start + ↓ | LR CZ swap |
| start + ← | D-pad mode change |
Polymega Version
v.poly.1.0.0.hex
This version is based on the Xinput version, with optimized button layouts for Polymega.
Button Mapping
| 3D Control Pad Buttons | + Mode | 〇 Mode |
|---|---|---|
| A | A | A |
| B | B | B |
| C | select | C |
| X | X | X |
| Y | Y | Y |
| Z | home | Z |
| L | Left Stick Press | L Trigger |
| R | Right Stick Press | R Trigger |
| start | start | start |
| Analog Stick | Non-functional | Left Stick |
| D-pad | D-pad | D-pad |
| Back Switch (Plus Version Only) | select | select |
Special Features
| Long Press Button | Function |
|---|---|
| start + ↑ | Swap AB XY |
| start + ↓ | Swap LR CZ |
| start + ← | Change D-pad Mode |
Polymega Saturn Optimized Version
v.poly.1.0.B.hex
When playing Saturn or Mega Drive games on Polymega, some fighting games have button mappings that differ from the default configuration.
This firmware registers different button mappings for + Mode and 〇 Mode, optimized for Polymega’s specifications.
Most games use 〇 Mode, while some fighting games use + Mode.
This firmware was created based on user feedback.
作ってみましたhttps://t.co/VTJFGQDeeb
+モードでxinput配置、〇モードでpolymega配置です
— たくさん 🐦 GEEKY Fab. (@takusanToIssho) 2024年5月6日
Button Mapping
| 3D Control Pad Buttons | + Mode | 〇 Mode |
|---|---|---|
| A | A | A |
| B | B | B |
| C | C | C |
| X | X | X |
| Y | Y | Y |
| Z | Z | Z |
| L | L | L |
| R | R | R |
| start | start | start |
| Analog Stick | Non-functional | Left Stick |
| D-pad | D-pad | D-pad |
| Back Switch (Plus Version Only) | home | home |
Special Features
| Long Press Button | Function |
|---|---|
| start + ↑ | Swap AB XY |
| start + ↓ | Swap LR CZ |
| start + ← | Change D-pad Mode |
Development Diary